I am thrilled to announce that I have been lucky enough to join the Design Team at Molossi Designs to feature their chipboard range. I'm so as excited about this opportunity and showcasing the wonderful new chipboard designs Molossi produce. Chipboard is a relatively new addition to the Molossi range and is growing on a daily basis. They have a wonderful blog http://www.molossidesigns.blogspot.com.au/ - pop over and check it out and also a facebook page - https://www.facebook.com/pages/Molossi/205866299435293?ref=ts&fref=ts#!/pages/Molossi/205866299435293?fref=ts
.
I look foward to sharing more Molossi news in the coming days, weeks and months :)
Thank you Suzanne & Josh for the opportunity to join you and the other designers - I can't wait to get stuck into it.

Monday, April 29, 2013

Monday, April 22, 2013
Back to school and back to busy
Well school has been back a week in sunny Qld and we are back to our usual routines. The dance eisteddfod season kicks off in a little over a week and I'm sure the next time I look up we will be preparing for Christmas concert.
Scrapwise I've been busy playing with the new nestabilities dies I received a few weeks back and learning the tricks to making the most of them. Pinterest has been a blessing and a curse these last few weeks as a troll for inspiration using these dies. Here is a couple of cards I've scraplifted from Pinterest using the Nestabilities Decorative Label 8 die and the ornate squares dies - looooove both these dies.


Scrapwise I've been busy playing with the new nestabilities dies I received a few weeks back and learning the tricks to making the most of them. Pinterest has been a blessing and a curse these last few weeks as a troll for inspiration using these dies. Here is a couple of cards I've scraplifted from Pinterest using the Nestabilities Decorative Label 8 die and the ornate squares dies - looooove both these dies.

this card was inspired by one by Shellypop.com which I found via Pinterest on the Splitcoast Stampers website - always a wealth of inspiration! So easy with the use of just two of the ornamental squares dies, patterned paper, cardstock and a varnished butterfly cut from a Prima patterned paper.


These two cards were created using the Nestabilities Decorative Labels 8 dies - again simply stunning dies which do all the work for you.
This card was inspired by one again via Pinterest from Splitcoast Stampers and the artist I was inspired by was Beate Johns.
I did however have a problem with this die in creating the shaped card idea which I studied many a video from Spellbinders on. However, I was lucky enough to follow a link from their website back to the blog of one of their talented design team - Linda Lucas. I sent Linda a message enquiring how to get a clean cut through the back of the card and she very kindly got straight back to me and told me to cut the die once, remove from the machine and rotate the die 90 degrees and then feed back through the machine a 2nd time - it works!!!! so simple and fabulous result. Thank you so much Linda for this help, has made it much easier to get a great result with these intricate dies. If you've never investigated the Spellbinders website - do yourself a favour. Go to their blog and they have heaps and heaps of step by step tutorials on how to recreate the gorgeous cards and layouts on display there and of course the stunning work of Linda and the rest of the Spellbinders Design Team.
I continued on the card run this week with a quick few cards created from a tutorial by Jane Clark for Aussie Scrap Source using an older paper but again a die - this time the Tim Holtz film strip

Next was a challenge between my girlfriend Michele and I at the end of a crop night to create one more card inpsired by something we saw on Pinterest. I must say neither card ended up looking like the one that inspired us but isn't that was being creative is all about?? Here's my card

and my final card for the week - again a Pinterest inspired one. This one for a male birthday

Again the die cutting machine got a work out with the stars being from the Couture Creations star collection. Freehand banners, a Kaisercraft happy Birthday stamp, some patterned paper, ink and a few buttons and of course a bit of embroidery thread.
So, with all this cardmaking you might ask if I've given up scrapbooking - no, definitely not. This week's scrapbook page is another to add to my book about me. I am gradually creating pages on all the important people in my life. I used a quote challenge over at Mad About Scrapping to help me finish this layout on a dear friend whom I've known since I was a teenager. The quote was "Friends are like stars, you don't always see them but you always know they are there". Perfect for this particular friend as we go many years without seeing each other but I treasure him and his friendship very much.
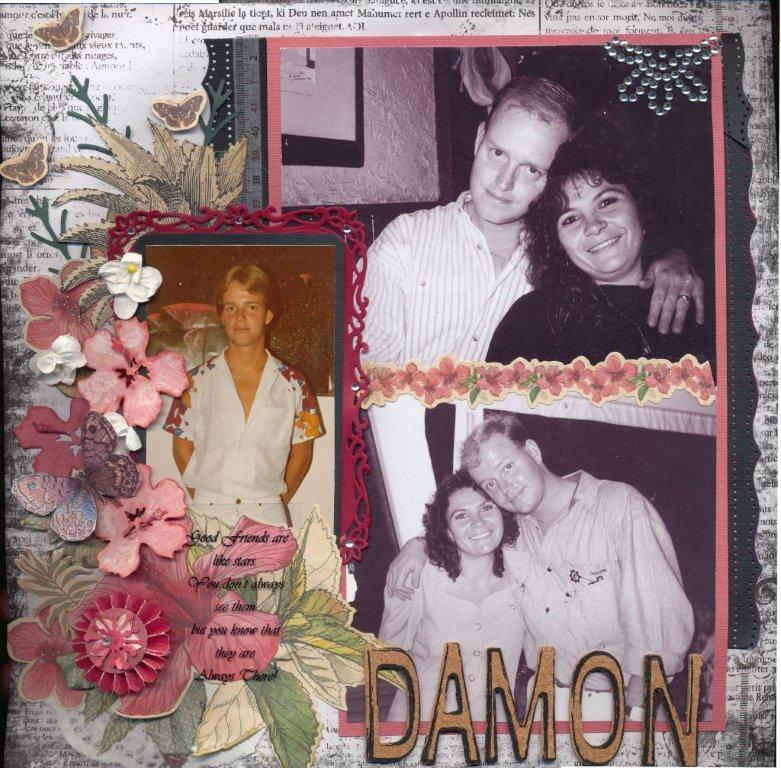
Some of the Kaisercraft Tropicana range used here, some handcutting, Tim Holtz rosette die, Bella cork lettering and Martha Stewart border punch.
Thanks for stopping by and leaving your comments - they mean so much xx
Friday, April 5, 2013
Birthdays, banners and butterflies
This week at our house is dominated by friend's birthdays - we have 5 to celebrate this week! and one of our girls celebrates her birthday next Monday. So, it was back to the scraproom to create some kids cards that will hopefully put a smile on the dial of the birthday girls and boys.
I did notice when I went to photograph them that there was a bit of a butterfly theme happening for the girls and banners for the boys - I suppose when you are on a roll you just have to go with it.


Add to these lot two a butterfly card which I've posted here previously starring a Purple Pumpkin embellishment and another card which I forgot to photograph before I darted out and handed it over the other day featuring an embossed background similar to the pink and black one above but all in whites and pinks and my butterfly theme is complete :)
One of the young boys celebrating is a Trash Packs fan - I have never come across this range before so I had fun researching a character to feature for his card. I have found recently that where I usually reach for flowers to complete a feminine card, washi tape is my go to product for masculine stuff. It added the perfect finishing touch for both the boys cards this week.
Tonight being Friday means I can escape back to my scrap room and am relieved from school holidays activities for a few brief hours. Let's hope my mojo kicks in and I can actually scrap a layout before I return to my never ending April of cards ......
I did notice when I went to photograph them that there was a bit of a butterfly theme happening for the girls and banners for the boys - I suppose when you are on a roll you just have to go with it.


Add to these lot two a butterfly card which I've posted here previously starring a Purple Pumpkin embellishment and another card which I forgot to photograph before I darted out and handed it over the other day featuring an embossed background similar to the pink and black one above but all in whites and pinks and my butterfly theme is complete :)
One of the young boys celebrating is a Trash Packs fan - I have never come across this range before so I had fun researching a character to feature for his card. I have found recently that where I usually reach for flowers to complete a feminine card, washi tape is my go to product for masculine stuff. It added the perfect finishing touch for both the boys cards this week.
Tonight being Friday means I can escape back to my scrap room and am relieved from school holidays activities for a few brief hours. Let's hope my mojo kicks in and I can actually scrap a layout before I return to my never ending April of cards ......
Sunday, March 31, 2013
Scrappy Easter
Happy Easter to everyone and thanks for stopping by. We have had a relatively quiet time here for a change. Our older girls took off to visit their Mum and it was just hubby and I and the two little ones left behind. We normally have a big Easter Sunday breakfast followed by the egg hunt and for the first time since the kids were babies it was just immediate family here for breakfast. We were joined by some of our longest serving friends so the kids could do their hunt which made it so much more fun.
The upside to a quiet Easter is that I got some time in the scrap room. I've completed 2 layouts and a card over the past couple of days - even with youngest daughter in there scrapping with me as well. Casey completed a layout also and did a damn fine job too I might say!
Here are my efforts


I took these photos last weekend when we took our A Model ford out to my nephew's wedding. They used the car for a few of the official bridal pics as well but here are my two babies posing in front of Dad's car.
I have used Kaisercraft's Pickled Pear collection of papers, some washi tape, a few acetate stars edged with mustard coloured Stazon ink, Tim Holtz alterations die - cogs and a Marianne Designs die which cut the gorgeous little old car in the top right corner.
The alpha is Bella cork and the chipboard cogs are Bo Bunny. I have also used a Martha Stewart border punch.
Lastly, our little brood grew this week with the addition of a beautiful new niece. Here is the card I made for her family to go with her welcome gift.

that's about all from my end of the world. Hope your Easter has been happy and safe and loaded with all the goodies the Easter bunny could carry.
Stay safe and for those of you about to start school holidays - I hope you get through them with your sanity xx
The upside to a quiet Easter is that I got some time in the scrap room. I've completed 2 layouts and a card over the past couple of days - even with youngest daughter in there scrapping with me as well. Casey completed a layout also and did a damn fine job too I might say!
Here are my efforts

These photos were taken on Australia Dayw hen we were isolated by floodwaters with both the nearby bridges under water. The rain just kept coming but nothing could keep the kids from their new bikes.
I have played with texture paste here and Dylusions and Glimmermist for the splashes of colour. The bunting and cogs are all cut from scrap paper - throw in a few buttons and a Basic Grey chipboard flower with a Kaisercraft sparklet and most of the hardwork is done. The alpha is Bella, painted and with a coating of Glossy Accents from Ranger.

I took these photos last weekend when we took our A Model ford out to my nephew's wedding. They used the car for a few of the official bridal pics as well but here are my two babies posing in front of Dad's car.
I have used Kaisercraft's Pickled Pear collection of papers, some washi tape, a few acetate stars edged with mustard coloured Stazon ink, Tim Holtz alterations die - cogs and a Marianne Designs die which cut the gorgeous little old car in the top right corner.
The alpha is Bella cork and the chipboard cogs are Bo Bunny. I have also used a Martha Stewart border punch.
Lastly, our little brood grew this week with the addition of a beautiful new niece. Here is the card I made for her family to go with her welcome gift.

that's about all from my end of the world. Hope your Easter has been happy and safe and loaded with all the goodies the Easter bunny could carry.
Stay safe and for those of you about to start school holidays - I hope you get through them with your sanity xx
Wednesday, March 27, 2013
Farewells, football and holidays
The end of another school term today and with it our family must say goodbye to Casey's Grade 1 teacher who is retiring :( This lady is a very dedicated teacher and Casey thoroughly enjoyed her time with her during Grade 1. The good literacy skills this lady instilled have helped Casey as she has continued her schooling so it is with a heavy heart we see her leave today but with joy for her for the next adventure in her life. Here is the card I have made to show her how much we will miss her. I love this quote which I found whilst scanning around the internet.


Casey is off playing touch football today as a gala day for school against other schools in the district - not usually the football player I am pleased that with just 30 minutes to school pickup I have not received a phone call advising me she's been carted off to hospital with something broken or sprained! She was so excited to be playing today so we shall see at pickup time if this newfound excitement for football continues or has been sated.
As I head out the door for the usual 2.30 drive to school, it is with relief that it will be the last such trip for a couple of weeks whilst we break for the Easter holidays and with the realisation that those quiet few hours during the day where I get to create and occassionally blog will be minimal for the next couple of weeks. If you don't see a blog post pop up for a while you know I'm out playing in the park, at the bowling alley throwing a few bowling balls or catching the last swims of the season in the pool with the kids.
I wish everyone a happy and above all safe Easter - may the Easter bunny bring you loads of chocolate and may you get to share the special meaning of Easter with those you love most.
Sunday, March 24, 2013
Cards and banners
It was back to card making for me on Friday evening at the Scrap of Difference crop/workshop night. I had my nephew's wedding to attend yesterday and was keen to make a card which matched their wedding invitations which I had made for them late last year. Sadly, I forgot to photograph this card prior to heading out the door to the wedding so I can't share it with you here.
However, this card did feature banners with the bride and groom's names on one and congratulations on the other. This got me started on a bit of a banners run and the following 2 cards came whilst I was on the roll.

I had a play with a new stamp - the grandpa kicking up his heels and my American Crafts Chromatix markers - I'm really enjoying these and love the shadings available.
The second card with the butterfly again featured a Purple Pumpkin spotty button - the perfect final touch to this card.
Well the storm is rumbling outside right now and the thunder sounds closer so think I'd best sign off and see if I can go and kit up a scrap project for tomorrow featuring some of the gorgeous photos I got at yesterday's wedding.
Thanks for stopping by.
However, this card did feature banners with the bride and groom's names on one and congratulations on the other. This got me started on a bit of a banners run and the following 2 cards came whilst I was on the roll.

I had a play with a new stamp - the grandpa kicking up his heels and my American Crafts Chromatix markers - I'm really enjoying these and love the shadings available.
The second card with the butterfly again featured a Purple Pumpkin spotty button - the perfect final touch to this card.
Well the storm is rumbling outside right now and the thunder sounds closer so think I'd best sign off and see if I can go and kit up a scrap project for tomorrow featuring some of the gorgeous photos I got at yesterday's wedding.
Thanks for stopping by.
Wednesday, March 20, 2013
Live Love Dance
Amazing as it seems I actually spent another afternoon in my scrap room this week and created a new layout - this time of my daughter and her friends, called Live Love Dance. I used a challenge over at Scrap the Boys (OK so I didn't use boys as my photos so not real suitable, however, this is where the inspiration started.....) to use chipboard, mists or paint and washi tape.
I pulled out some mists which worked with my photo - in this case Dylusions Pillar Box Red and Lindy's Stamp Gang Luscious Lime & Hag's Wart Orange and got to work on a piece of white card - this I then cut into a circle thanks to the Crafter's Workshop Circles 'n' Circles template - love this template - it gives so many different circle sized options, worth having in any scrap tool kit.
Add some patterned paper - in this case Basic Grey Lauderdale cut to shape with the help of a Crafter's Workshop bracket template and a piece of red cardstock run through the cuttlebug with the beautiful Couture Collections Drifting Endless embossing folder and then rubbed down with some sandpaper.
For the pretties I have again been playing with Purple pumpkin products including their small resin flowers, paper doilies and music washi tape. Some amazing chipboard from Meant to Be along with their felt flower. I changed the colour of the chipboard with the help of some Adironack Pitch Black Dabber and outlined them with a copper Sakura Gelly Roll pen and then glazed them with some 3D laquer from Scrap Matts . This 3d glaze is awesome, it comes in a little bottle like nail polish which allows you to add gloss to the tiniest of objects.
Finishing touches included some chipboard leaves from Twiddlybitz also coloured with Sakura gelly roll pens, some Kaisercraft flowers, Say it in Crystals gemstones, a Martha Stewart aster punch and the centre glory floral of a Prima Baroque Sienna flower and a Fairy Flora smaller flower.

Thanks for stopping by
I pulled out some mists which worked with my photo - in this case Dylusions Pillar Box Red and Lindy's Stamp Gang Luscious Lime & Hag's Wart Orange and got to work on a piece of white card - this I then cut into a circle thanks to the Crafter's Workshop Circles 'n' Circles template - love this template - it gives so many different circle sized options, worth having in any scrap tool kit.
Add some patterned paper - in this case Basic Grey Lauderdale cut to shape with the help of a Crafter's Workshop bracket template and a piece of red cardstock run through the cuttlebug with the beautiful Couture Collections Drifting Endless embossing folder and then rubbed down with some sandpaper.
For the pretties I have again been playing with Purple pumpkin products including their small resin flowers, paper doilies and music washi tape. Some amazing chipboard from Meant to Be along with their felt flower. I changed the colour of the chipboard with the help of some Adironack Pitch Black Dabber and outlined them with a copper Sakura Gelly Roll pen and then glazed them with some 3D laquer from Scrap Matts . This 3d glaze is awesome, it comes in a little bottle like nail polish which allows you to add gloss to the tiniest of objects.
Finishing touches included some chipboard leaves from Twiddlybitz also coloured with Sakura gelly roll pens, some Kaisercraft flowers, Say it in Crystals gemstones, a Martha Stewart aster punch and the centre glory floral of a Prima Baroque Sienna flower and a Fairy Flora smaller flower.

Thanks for stopping by
Subscribe to:
Posts (Atom)